HOW TO CONNECT THE ENTIRE NETWORK SYSTEM?
1. Before purchasing this product , please read this manual carefully and patiently to avoid misunderstanding of the purpose of the product and wrong connection leading to inaccessible network.
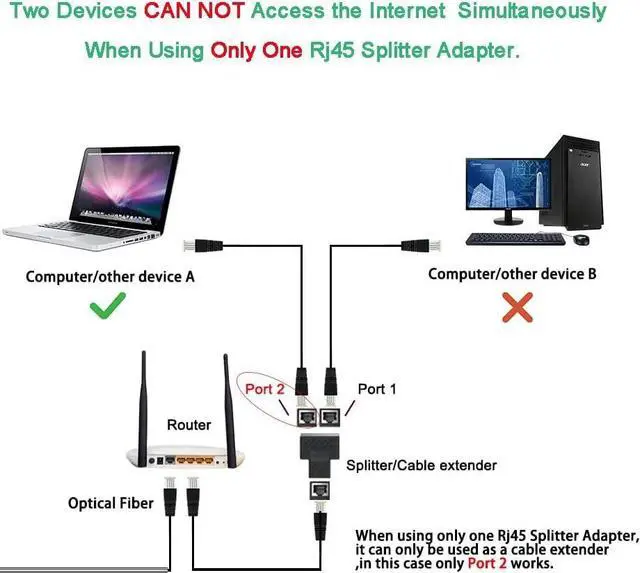
2. The main function of this product is to combine 2 cables to 1 (through 8 core network cable embedded in the wall usually) and then split again to 2 lan cables in another room or occasion so that they can share the same network, which reduces the length of network cable originally required and saves the money. Home and office will be the most occasion to apply this connections. If you just want to realize one network cable split to 2 directly by using one splitter and 3 lan cable then it can not make two devices surf internet at the same time. The original design of our product is to use in pairs. It will only be lan cable extender and only Port 2 works as the diagram shows below.
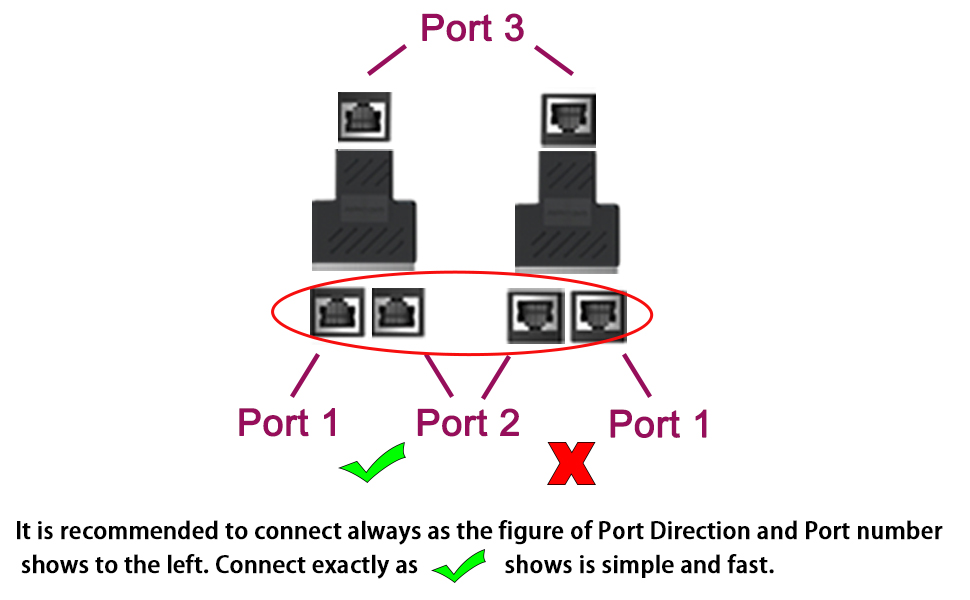
3. Let us start with the labeling Port and the unified placement direction.
The components needed to realize the simultaneous Internet access of two computers are:
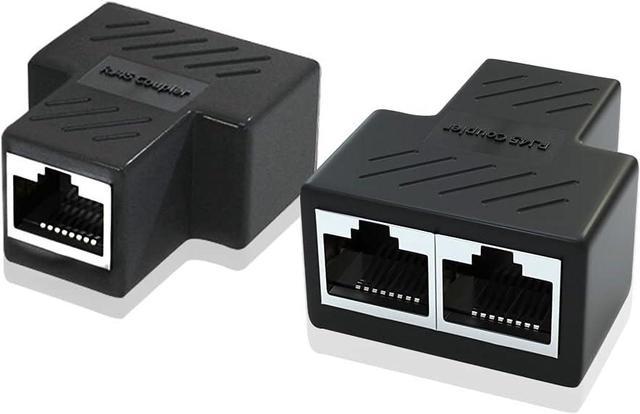
5 network cables(6 if there is an 8 core cable embedded inside the wall already) + 2 identical Splitters (Splitter A and Splitter B); Each Splitter has 3 ports: Port 1, Port 2, Port 3.
Please pay attention to the distinction between Port 1 and Port 2. As shown in the picture above, the label on the left is Port 1, and the label on the right is Port 2.
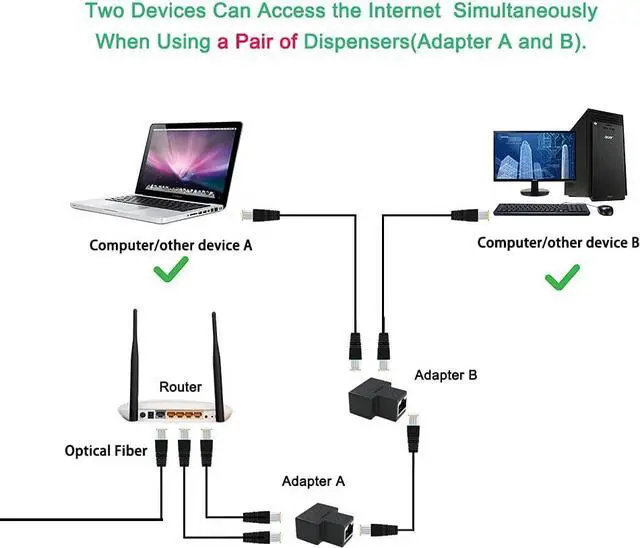
And, we recommend use them in pairs, otherwise the purpose of two devices going online at the same time cannot be achieved.
4. When connecting, make sure that the directions of the corresponding ports of the two Splitters are the same. Connect according to the direction of the left picture with the check mark in the top port connection diagram, please do not use it in reverse. If the interfaces corresponding to the two Splitters are facing different directions(one splitter side with "RJ45 Coupler" face up, another splitter side with"RJ45 Coupler" face down), the network cannot be accessed.
5. The product is compatible with cat5 cat5e cat6 cat7 cat8 cable; however, The internet speed that can reach through the splitter is 100MB maximum only.
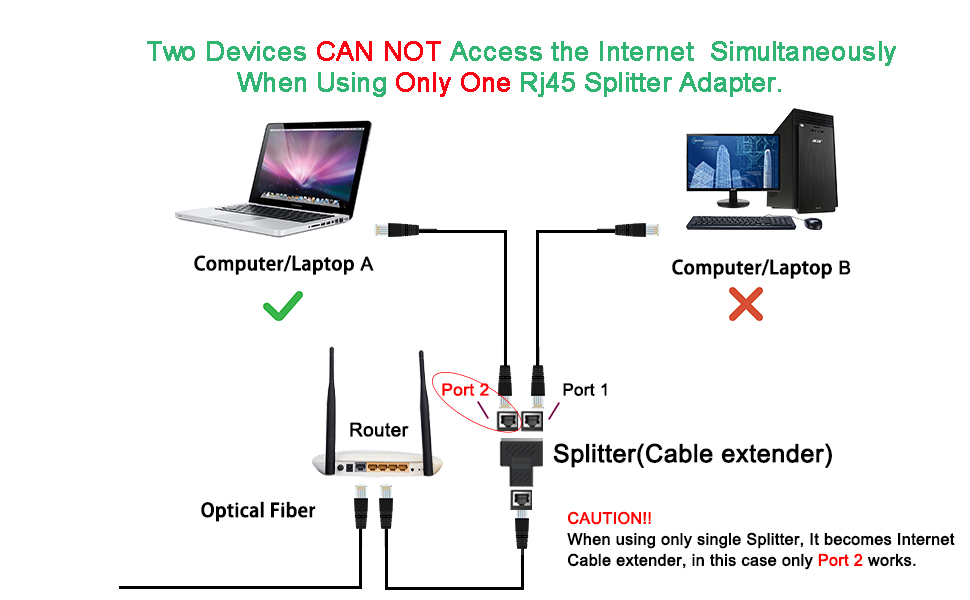
1. If you do not use a pair of splitters, you will not be able to connect two computers to the Internet at the same time, in this case the splitter can only be used as a network cable connector or extender (only Port 2 works).
2. It is recommended to use the splitter in pairs to apply the connection example listed below so that two computers/devices can get to internet Simultaneously. Please also be aware of the Port direction shows above.
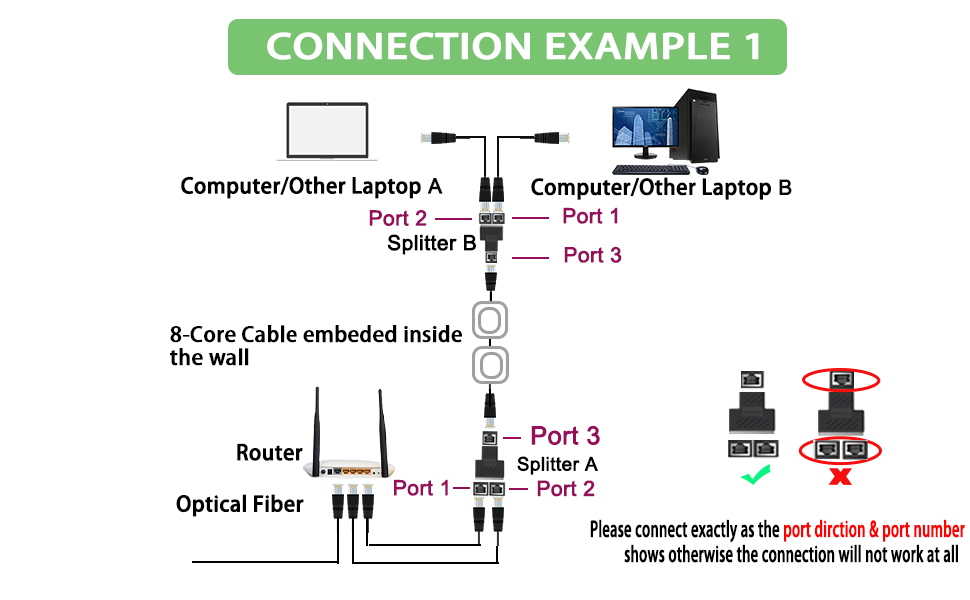
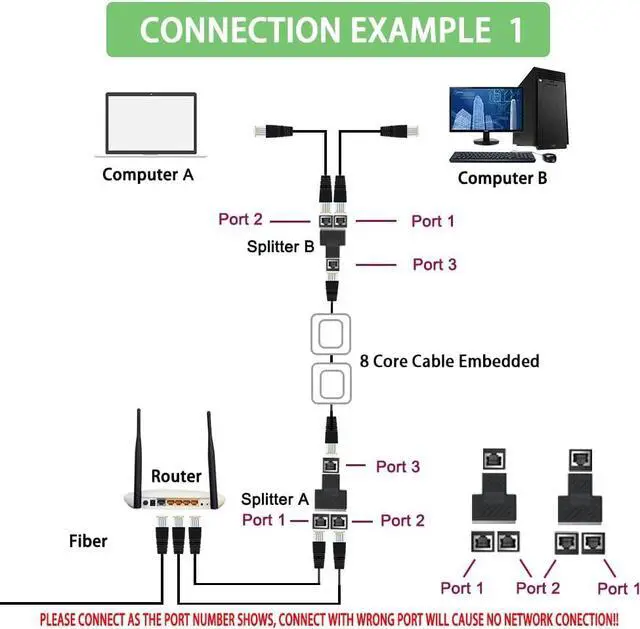
In the application scenario of Example 1, the connection steps are:
1. Use two network cables to connect Port 1 and Port 2 of Splitter A from the lan port of the router.
2. Use a network cable to connect Port 3. from Splitter A to Splitter B. (If there is an 8-core network cable embedded in the wall, you would need 2 additional network cables to link port 3 of the Splitter A to the wall so as the port 3 of the Splitter B)
3. Use two network cables to connect the two computers A and B that want to surf the Internet at the same time to Port 1 and Port 2 of Splitter B
4. Connection completed. The is exactly the example that video shows.
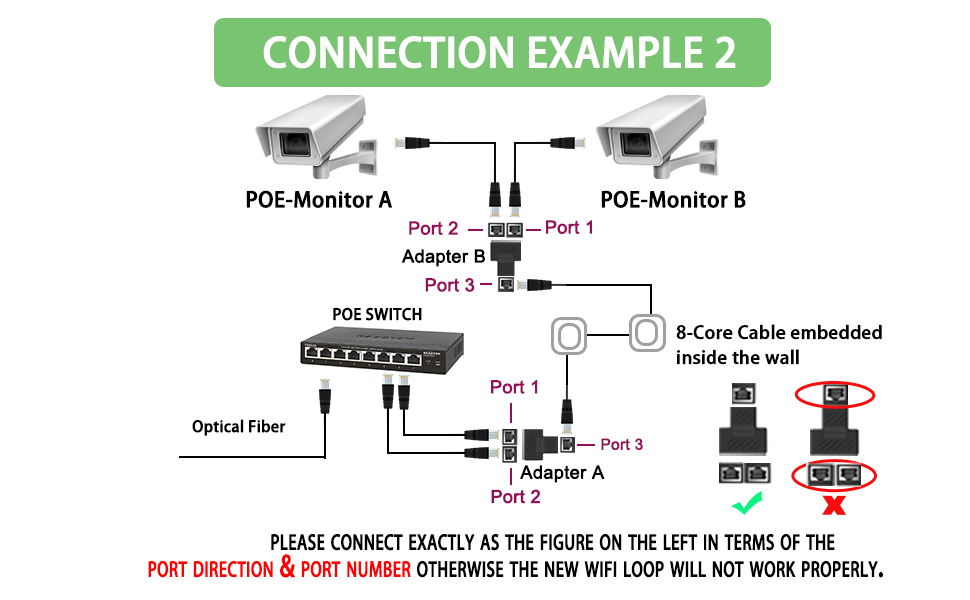
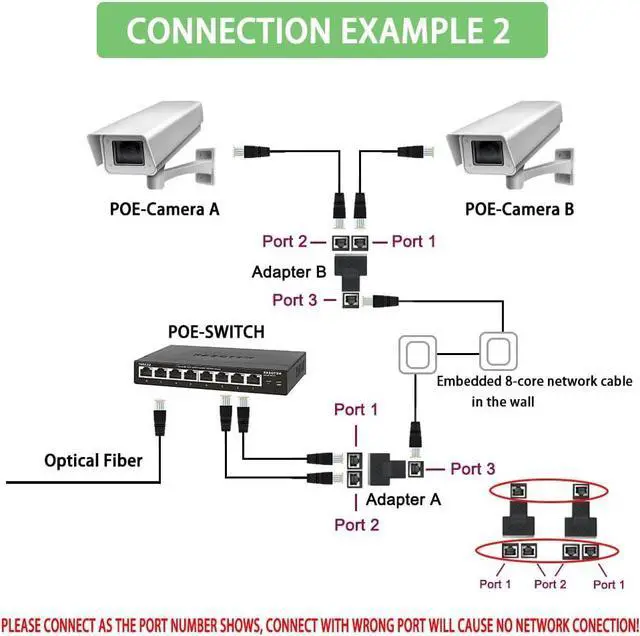
In the application scenario of Example 2, the connection steps are:
1. Use two network cables to connect Port 1 and Port 2 on Splitter A to the POE switch.
2. Use a network cable to connect from Splitter A to Splitter B Port 3. (If there is an 8-core network cable embedded in the wall, you would need 2 additional network cables to link port 3 of the Splitter A to the wall so as the port 3 of the Splitter B)
3. Use two network cables to connect two POE monitors to Port 1 and Port 2 of Splitter B.
4. Connection completed
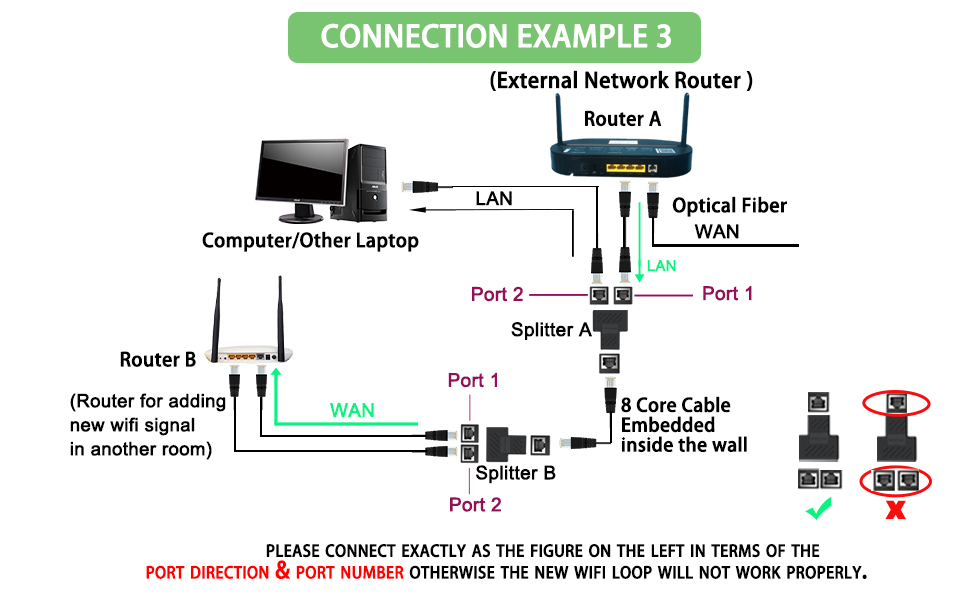
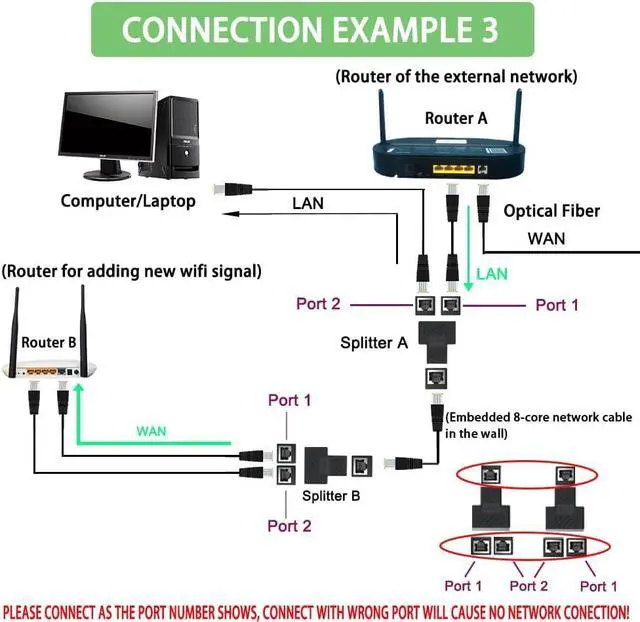
In the application scenario of Example 3, the connection method is slightly more complicated, and the steps are:
1. Use a network cable to connect Port 1 on Splitter A with the lan port (external network) of Router A (as shown by the green line on the upper right).
2. Use a network cable to connect Port 2 on Splitter A to a computer you want to share the network with
3. Use a network cable to connect Splitter A and Splitter B (If there is an 8-core network cable embedded in the wall, you would need 2 additional network cables to link port 3 of the Splitter A to the wall so as the port 3 of the Splitter B)
4. Use a network cable to connect Port 1 on Splitter B to the Wan port of Router B. (the green line at the bottom left). This step is the core operation of adding WIFI signal to router B as the loop. If the port connection is wrong, the entire network cannot be connected.
Please carefully check connection shows the figure in terms of the Port number and direction.
5. Use a network cable to connect Port 2 on Splitter B to the LAN port on Router B. After the connection is completed, you can share the new network in the room where Router B is located, and increase the wireless network signal through Router B. (If Router B does not generate a network, please try to reset Router B, or try to restart Router B)


